Difference between revisions of "Palace of Flame"
Jump to navigation
Jump to search
ChloeNebula (talk | contribs) |
Spongiform (talk | contribs) m (Fixed some typos.) |
||
| (4 intermediate revisions by 3 users not shown) | |||
| Line 1: | Line 1: | ||
| + | {{Incomplete|[[Refactor]] March 02, 2023}} | ||
{{Infobox Location | {{Infobox Location | ||
| − | |image = https://idlescape.com/images/misc/keys/flame_feather.png | + | |image = https://play.idlescape.com/images/misc/keys/flame_feather.png |
|zone-type = [[Combat]] | |zone-type = [[Combat]] | ||
|dangerous = Yes | |dangerous = Yes | ||
| Line 9: | Line 10: | ||
|recommended-gear = Stygian +0 | |recommended-gear = Stygian +0 | ||
}} | }} | ||
| − | The '''Palace of | + | The '''Palace of Flame''' is a group [[Combat#Zones|combat area]]. It is the source of the [[Mantle of Flame]]. To access the '''Palace of Flame''', a [[Burning Feather]] is required. |
Players require early end-game equipment/food to survive, and food with [[Flame Resistance]] buff is recommended to protect against the dungeon wide debuff [[Overheat]] | Players require early end-game equipment/food to survive, and food with [[Flame Resistance]] buff is recommended to protect against the dungeon wide debuff [[Overheat]] | ||
| − | Palace of | + | '''Palace of Flame''' allows up to 2 players. |
Monsters in the dungeon are weak to stab type weapons. | Monsters in the dungeon are weak to stab type weapons. | ||
| Line 67: | Line 68: | ||
|{{img|Ancient Fire Amulet|25|word=1}} | |{{img|Ancient Fire Amulet|25|word=1}} | ||
|- | |- | ||
| − | | | + | |<img src='https://www.play.idlescape.com/images/combat/monsters/elite/chicken_elite.png' alt='Just a Chicken' width='60px' height='60px' /> Just a Chicken |
| style="text-align:center;" |1 | | style="text-align:center;" |1 | ||
| style="text-align:center;" |{{?}} | | style="text-align:center;" |{{?}} | ||
| Line 147: | Line 148: | ||
!Price | !Price | ||
|- | |- | ||
| − | |<img src="https://idlescape.com/images/money_icon.png" height="auto" width="45"> | + | |<img src="https://play.idlescape.com/images/money_icon.png" height="auto" width="45"> |
|[[Gold]] | |[[Gold]] | ||
|style="text-align: center;" |1 - 25,000{{?}} | |style="text-align: center;" |1 - 25,000{{?}} | ||
| Line 153: | Line 154: | ||
|style="text-align: center;" |1 | |style="text-align: center;" |1 | ||
|- | |- | ||
| − | |<img src="https://idlescape.com/images/misc/Giant_Scrap.png" height="auto" width="45"> | + | |<img src="https://play.idlescape.com/images/misc/Giant_Scrap.png" height="auto" width="45"> |
|[[Giant Scraps]] | |[[Giant Scraps]] | ||
|style="text-align: center;" |1 - 30{{?}} | |style="text-align: center;" |1 - 30{{?}} | ||
| Line 159: | Line 160: | ||
|style="text-align: center;" |50,000 | |style="text-align: center;" |50,000 | ||
|- | |- | ||
| − | |<img alt="Air Rune.png" src="https://idlescape.com/images/runecrafting/air_rune.png" height="auto" width="45"> | + | |<img alt="Air Rune.png" src="https://play.idlescape.com/images/runecrafting/air_rune.png" height="auto" width="45"> |
|[[Runes|Air Rune]] | |[[Runes|Air Rune]] | ||
|style="text-align: center;" |1 - 300 | |style="text-align: center;" |1 - 300 | ||
| Line 165: | Line 166: | ||
|style="text-align: center;" |10 | |style="text-align: center;" |10 | ||
|- | |- | ||
| − | |<img alt="Earth Rune.png" src="https://idlescape.com/images/runecrafting/earth_rune.png" height="auto" width="45"> | + | |<img alt="Earth Rune.png" src="https://play.idlescape.com/images/runecrafting/earth_rune.png" height="auto" width="45"> |
|[[Runes|Earth Rune]] | |[[Runes|Earth Rune]] | ||
|style="text-align: center;" |1 - 300 | |style="text-align: center;" |1 - 300 | ||
| Line 171: | Line 172: | ||
|style="text-align: center;" |10 | |style="text-align: center;" |10 | ||
|- | |- | ||
| − | |<img alt="Fire Rune.png" src="https://idlescape.com/images/runecrafting/fire_rune.png" height="auto" width="45"> | + | |<img alt="Fire Rune.png" src="https://play.idlescape.com/images/runecrafting/fire_rune.png" height="auto" width="45"> |
|[[Runes|Fire Rune]] | |[[Runes|Fire Rune]] | ||
|style="text-align: center;" |1 - 300 | |style="text-align: center;" |1 - 300 | ||
| Line 177: | Line 178: | ||
|style="text-align: center;" |10 | |style="text-align: center;" |10 | ||
|- | |- | ||
| − | |<img alt="Water Rune.png" src="https://idlescape.com/images/runecrafting/water_rune.png" height="auto" width="45"> | + | |<img alt="Water Rune.png" src="https://play.idlescape.com/images/runecrafting/water_rune.png" height="auto" width="45"> |
|[[Runes|Water Rune]] | |[[Runes|Water Rune]] | ||
|style="text-align: center;" |1 - 300 | |style="text-align: center;" |1 - 300 | ||
| Line 183: | Line 184: | ||
|style="text-align: center;" |10 | |style="text-align: center;" |10 | ||
|- | |- | ||
| − | |<img alt="Blood Rune.png" src="https://idlescape.com/images/runecrafting/blood_rune.png" height="auto" width="45"> | + | |<img alt="Blood Rune.png" src="https://play.idlescape.com/images/runecrafting/blood_rune.png" height="auto" width="45"> |
|[[Runes|Blood Rune]] | |[[Runes|Blood Rune]] | ||
|style="text-align: center;" |1 - 300 | |style="text-align: center;" |1 - 300 | ||
| Line 189: | Line 190: | ||
|style="text-align: center;" |10 | |style="text-align: center;" |10 | ||
|- | |- | ||
| − | |<img alt="Death Rune.png" src="https://idlescape.com/images/runecrafting/death_rune.png" height="auto" width="45"> | + | |<img alt="Death Rune.png" src="https://play.idlescape.com/images/runecrafting/death_rune.png" height="auto" width="45"> |
|[[Runes|Death Rune]] | |[[Runes|Death Rune]] | ||
|style="text-align: center;" |1 - 300 | |style="text-align: center;" |1 - 300 | ||
| Line 195: | Line 196: | ||
|style="text-align: center;" |10 | |style="text-align: center;" |10 | ||
|- | |- | ||
| − | |<img alt="Chaos Rune.png" src="https://idlescape.com/images/runecrafting/chaos_rune.png" height="auto" width="45"> | + | |<img alt="Chaos Rune.png" src="https://play.idlescape.com/images/runecrafting/chaos_rune.png" height="auto" width="45"> |
|[[Runes|Chaos Rune]] | |[[Runes|Chaos Rune]] | ||
|style="text-align: center;" |1 - 300 | |style="text-align: center;" |1 - 300 | ||
| Line 201: | Line 202: | ||
|style="text-align: center;" |10 | |style="text-align: center;" |10 | ||
|- | |- | ||
| − | |<img alt="Nature Rune.png" src="https://idlescape.com/images/runecrafting/nature_rune.png" height="auto" width="45"> | + | |<img alt="Nature Rune.png" src="https://play.idlescape.com/images/runecrafting/nature_rune.png" height="auto" width="45"> |
|[[Runes|Nature Rune]] | |[[Runes|Nature Rune]] | ||
|style="text-align: center;" |1 - 300 | |style="text-align: center;" |1 - 300 | ||
| Line 207: | Line 208: | ||
|style="text-align: center;" |10 | |style="text-align: center;" |10 | ||
|- | |- | ||
| − | |<img alt="Mind Rune.png" src="https://idlescape.com/images/runecrafting/mind_rune.png" height="auto" width="45"> | + | |<img alt="Mind Rune.png" src="https://play.idlescape.com/images/runecrafting/mind_rune.png" height="auto" width="45"> |
|[[Runes|Mind Rune]] | |[[Runes|Mind Rune]] | ||
|style="text-align: center;" |1 - 50 | |style="text-align: center;" |1 - 50 | ||
| Line 213: | Line 214: | ||
|style="text-align: center;" |10 | |style="text-align: center;" |10 | ||
|- | |- | ||
| − | |<img alt="Cosmic Rune.png" src="https://idlescape.com/images/runecrafting/cosmic_rune.png" height="auto" width="45"> | + | |<img alt="Cosmic Rune.png" src="https://play.idlescape.com/images/runecrafting/cosmic_rune.png" height="auto" width="45"> |
|[[Runes|Cosmic Rune]] | |[[Runes|Cosmic Rune]] | ||
|style="text-align: center;" |1 - 50 | |style="text-align: center;" |1 - 50 | ||
| Line 219: | Line 220: | ||
|style="text-align: center;" |10 | |style="text-align: center;" |10 | ||
|- | |- | ||
| − | |<img src="https://idlescape.com/images/runecrafting/fire_talisman.png" height="auto" width="45"> | + | |<img src="https://play.idlescape.com/images/runecrafting/fire_talisman.png" height="auto" width="45"> |
|[[Fire Talisman]] | |[[Fire Talisman]] | ||
|style="text-align: center;" |1 - 3 | |style="text-align: center;" |1 - 3 | ||
| Line 225: | Line 226: | ||
|style="text-align: center;" | - | |style="text-align: center;" | - | ||
|- | |- | ||
| − | |<img src="https://idlescape.com/images/runecrafting/water_talisman.png" height="auto" width="45"> | + | |<img src="https://play.idlescape.com/images/runecrafting/water_talisman.png" height="auto" width="45"> |
|[[Water Talisman]] | |[[Water Talisman]] | ||
|style="text-align: center;" |1 - 3 | |style="text-align: center;" |1 - 3 | ||
| Line 231: | Line 232: | ||
|style="text-align: center;" | - | |style="text-align: center;" | - | ||
|- | |- | ||
| − | |<img src="https://idlescape.com/images/runecrafting/blood_talisman.png" height="auto" width="45"> | + | |<img src="https://play.idlescape.com/images/runecrafting/blood_talisman.png" height="auto" width="45"> |
|[[Blood Talisman]] | |[[Blood Talisman]] | ||
|style="text-align: center;" |1 - 3 | |style="text-align: center;" |1 - 3 | ||
| Line 237: | Line 238: | ||
|style="text-align: center;" | - | |style="text-align: center;" | - | ||
|- | |- | ||
| − | |<img src="https://idlescape.com/images/runecrafting/chaos_talisman.png" height="auto" width="45"> | + | |<img src="https://play.idlescape.com/images/runecrafting/chaos_talisman.png" height="auto" width="45"> |
|[[Chaos Talisman]] | |[[Chaos Talisman]] | ||
|style="text-align: center;" |1 - 3 | |style="text-align: center;" |1 - 3 | ||
| Line 243: | Line 244: | ||
|style="text-align: center;" | - | |style="text-align: center;" | - | ||
|- | |- | ||
| − | |<img src="https://idlescape.com/images/runecrafting/nature_talisman.png" height="auto" width="45"> | + | |<img src="https://play.idlescape.com/images/runecrafting/nature_talisman.png" height="auto" width="45"> |
|[[Nature Talisman]] | |[[Nature Talisman]] | ||
|style="text-align: center;" |1 - 3 | |style="text-align: center;" |1 - 3 | ||
| Line 249: | Line 250: | ||
|style="text-align: center;" | - | |style="text-align: center;" | - | ||
|- | |- | ||
| − | |<img src="https://idlescape.com/images/mining/stygian_ore.png" height="auto" width="45"> | + | |<img src="https://play.idlescape.com/images/mining/stygian_ore.png" height="auto" width="45"> |
|[[Stygian Ore]] | |[[Stygian Ore]] | ||
|style="text-align: center;" |1 - 100 | |style="text-align: center;" |1 - 100 | ||
| Line 255: | Line 256: | ||
|style="text-align: center;" |1,000 | |style="text-align: center;" |1,000 | ||
|- | |- | ||
| − | |<img src="https://idlescape.com/images/mining/sapphire.png" height="auto" width="45"> | + | |<img src="https://play.idlescape.com/images/mining/sapphire.png" height="auto" width="45"> |
|[[Sapphire]] | |[[Sapphire]] | ||
|style="text-align: center;" |1 - 5 | |style="text-align: center;" |1 - 5 | ||
| Line 261: | Line 262: | ||
|style="text-align: center;" |1,000 | |style="text-align: center;" |1,000 | ||
|- | |- | ||
| − | |<img src="https://idlescape.com/images/mining/emerald.png" height="auto" width="45"> | + | |<img src="https://play.idlescape.com/images/mining/emerald.png" height="auto" width="45"> |
|[[Emerald]] | |[[Emerald]] | ||
|style="text-align: center;" |1 - 4 | |style="text-align: center;" |1 - 4 | ||
| Line 267: | Line 268: | ||
|style="text-align: center;" |2,000 | |style="text-align: center;" |2,000 | ||
|- | |- | ||
| − | |<img src="https://idlescape.com/images/mining/ruby.png" height="auto" width="45"> | + | |<img src="https://play.idlescape.com/images/mining/ruby.png" height="auto" width="45"> |
|[[Ruby]] | |[[Ruby]] | ||
|style="text-align: center;" |1 - 3 | |style="text-align: center;" |1 - 3 | ||
| Line 273: | Line 274: | ||
|style="text-align: center;" |5,000 | |style="text-align: center;" |5,000 | ||
|- | |- | ||
| − | |<img src="https://idlescape.com/images/mining/diamond.png" height="auto" width="45"> | + | |<img src="https://play.idlescape.com/images/mining/diamond.png" height="auto" width="45"> |
|[[Diamond]] | |[[Diamond]] | ||
|style="text-align: center;" |1 - 2 | |style="text-align: center;" |1 - 2 | ||
| Line 279: | Line 280: | ||
|style="text-align: center;" |10,000 | |style="text-align: center;" |10,000 | ||
|- | |- | ||
| − | |<img src="https://idlescape.com/images/mining/black_opal.png" height="auto" width="45"> | + | |<img src="https://play.idlescape.com/images/mining/black_opal.png" height="auto" width="45"> |
|[[Black Opal]] | |[[Black Opal]] | ||
|style="text-align: center;" |1 | |style="text-align: center;" |1 | ||
| Line 285: | Line 286: | ||
|style="text-align: center;" |50,000 | |style="text-align: center;" |50,000 | ||
|- | |- | ||
| − | |<img alt="Stygian Boots.png" src="https://idlescape.com/images/combat/equipment/stygian_boots_icon.png" height="auto" width="45"> | + | |<img alt="Stygian Boots.png" src="https://play.idlescape.com/images/combat/equipment/stygian_boots_icon.png" height="auto" width="45"> |
|[[Stygian Boots]] | |[[Stygian Boots]] | ||
|style="text-align: center;" |1 - 2 | |style="text-align: center;" |1 - 2 | ||
| Line 291: | Line 292: | ||
|style="text-align: center;" |2,880,000 | |style="text-align: center;" |2,880,000 | ||
|- | |- | ||
| − | |<img src="https://idlescape.com/images/misc/elite/Elite_Scroll_Giant.png" height="auto" width="45"> | + | |<img src="https://play.idlescape.com/images/misc/elite/Elite_Scroll_Giant.png" height="auto" width="45"> |
|[[Giant Scroll]] | |[[Giant Scroll]] | ||
|style="text-align: center;" |1 | |style="text-align: center;" |1 | ||
| Line 297: | Line 298: | ||
|style="text-align: center;" |500 | |style="text-align: center;" |500 | ||
|- | |- | ||
| − | |<img src="https://idlescape.com/images/magic/giants_gem.png" height="auto" width="45"> | + | |<img src="https://play.idlescape.com/images/magic/giants_gem.png" height="auto" width="45"> |
|[[Giant King's Jewel]] | |[[Giant King's Jewel]] | ||
|style="text-align: center;" |1 | |style="text-align: center;" |1 | ||
| Line 303: | Line 304: | ||
|style="text-align: center;" |2,500,000 | |style="text-align: center;" |2,500,000 | ||
|- | |- | ||
| − | |<img src="https://idlescape.com/images/combat/equipment/Shapeless_Scythe_Icon.png" height="auto" width="45"> | + | |<img src="https://play.idlescape.com/images/combat/equipment/Shapeless_Scythe_Icon.png" height="auto" width="45"> |
|[[Shapeless Scythe]] | |[[Shapeless Scythe]] | ||
|style="text-align: center;" |1 | |style="text-align: center;" |1 | ||
Latest revision as of 13:58, 3 June 2024

 | |
| Type of zone | Combat |
|---|---|
| Dangerous | Yes |
| Encounters | |
| Max Players | 2 |
| Notable Drops | Mantle of Flame |
| Zone Recommendations | |
| Rec. Combat Levels | 99 |
| Rec. Gear | Stygian +0 |
The Palace of Flame is a group combat area. It is the source of the Mantle of Flame. To access the Palace of Flame, a Burning Feather is required. Players require early end-game equipment/food to survive, and food with Flame Resistance buff is recommended to protect against the dungeon wide debuff Overheat
Palace of Flame allows up to 2 players.
Monsters in the dungeon are weak to stab type weapons.
Recommended Gear
2 Man
- Level: 90+ in all three combat skills
- Armor: Stygian +0 with enchantments.
- Weapon: [?]
- Food: Roughly 600 HP total in Flame Resistance food. Demon Skin and Nimble are not necessary unless recommended gear above is not met.[?]
- Auto Eat: 70 or 60 health with Protection
- Time: [?]
1 Man
- Level: 99 in all three combat skills
- Armor: Stygian +5 with enchantments, protection is a MUST. last phoenix hit for 70 with protection. Kings Crown+10 W reinforcment.
- Weapon: Slow weapon so you don't burn through flame resistance. Augged scythe good.[?]
- Food: Roughly 800 HP total in Flame Resistance food. Demon Skin and Nimble are not necessary unless recommended gear above is not met.[?]
- Auto Eat: 80
- Time: [?]
Monsters
| Monster | Encounters | Max Hit | HP | Notable Drops |
|---|---|---|---|---|
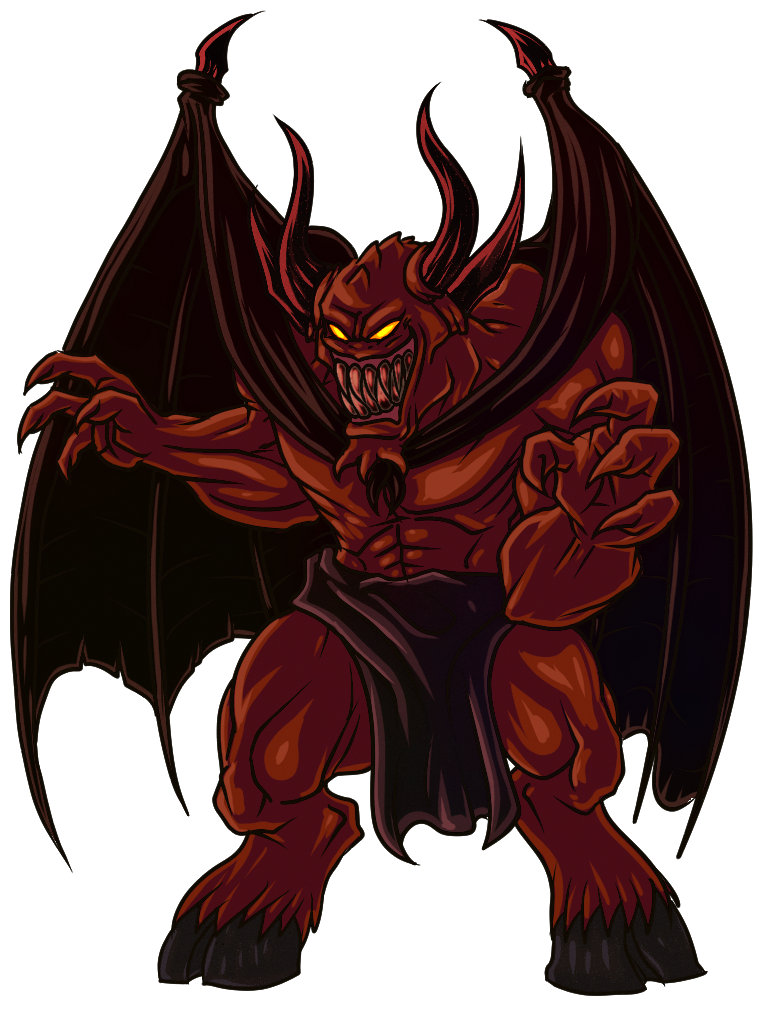 Ember Demon Ember Demon
|
1 | [?] | 275 | [?] |
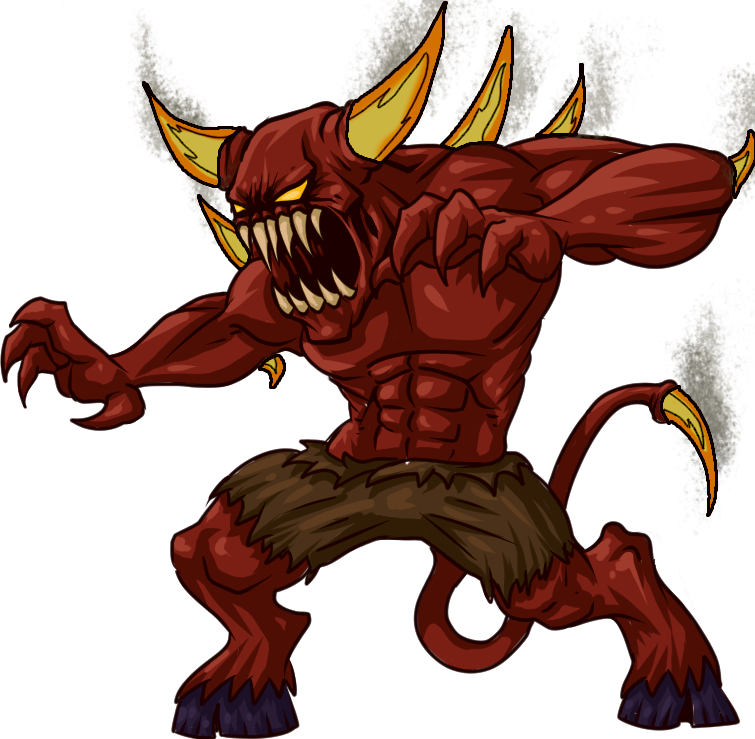 Flame Demon Flame Demon
|
2 | [?] | 962/1,100 | [?] |
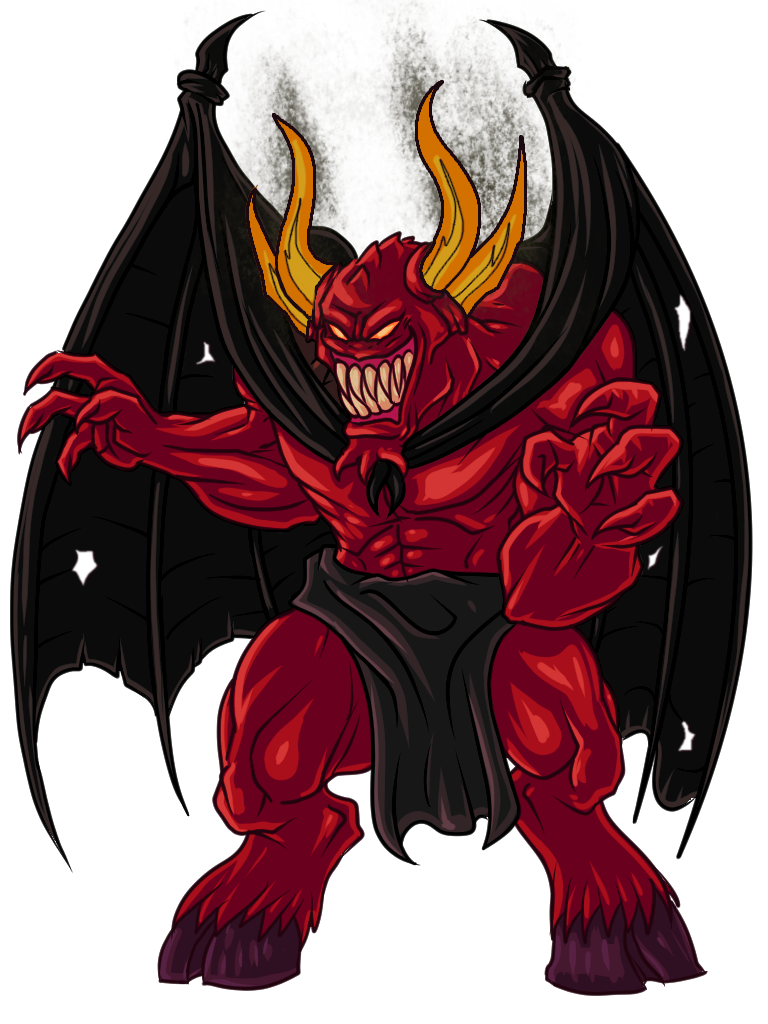 Inferno Demon Inferno Demon
|
1 | [?] | 1,400 | Crest of Chaos |
| Inferno Giant | 1 | [?] | 1,150 | 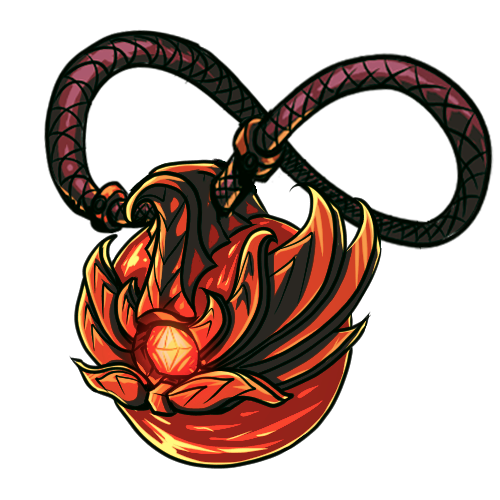 Ancient Fire Amulet Ancient Fire Amulet
|
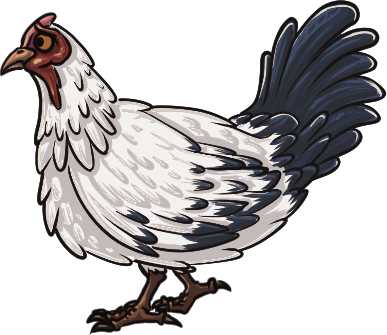 Just a Chicken Just a Chicken
|
1 | [?] | 300 | [?] |
| Phoenix 1 | 1 | [?] | 500 | Ancient Fire Amulet Mantle of Flame Mantle of Flame
|
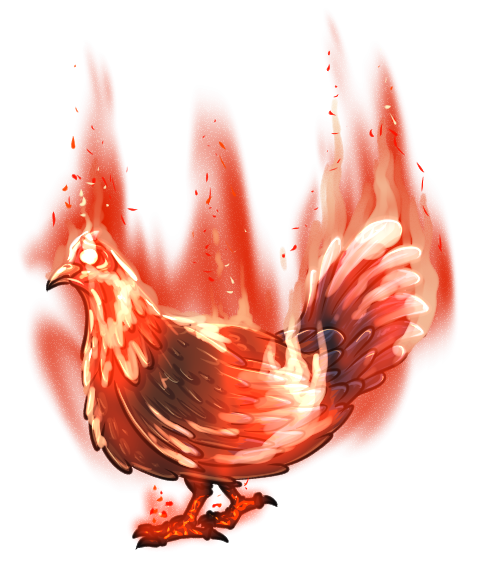 Phoenix 2 Phoenix 2
|
1 | [?] | 750 | Ancient Fire Amulet Mantle of Flame
|
 Phoenix 3 Phoenix 3
|
1 | [?] | 1,000 | Ancient Fire Amulet Mantle of Flame
|
 Phoenix 4 Phoenix 4
|
1 | 85 | 1,250 | Ancient Fire Amulet Mantle of Flame
|

|
Completion | - | - | Mantle of Flame
|
Completion Drops
100%
| Item | Quantity | Rarity | Price |
|---|---|---|---|
| 25,000 - 150,000[?] | Always | - | |
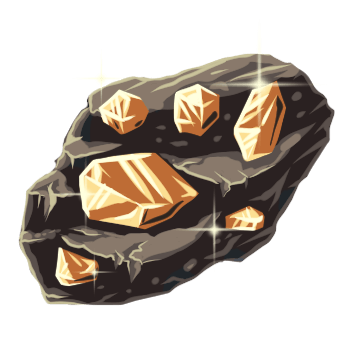 Gold Ore Gold Ore
|
350 - 3,500[?] | Always | 100 |
 Coal Coal
|
350 - 2,000[?] | Always | 20 |
 Feather Feather
|
500 - 16,000[?] | Always | 6 |